
Imaging Review Tips for Advance Practice Providers
Author— James Lynch, Advanced Practice Provider, Pain Consultants of San Diego Published June 14, 2022
According to our Advanced Practice Provider (APP) Advisory Board, imaging review, a key aspect of mild® patient candidate identification, is often not included in initial schooling. To help APPs learn the basics of image review, become more familiar with identifying anatomical landmarks, and understand how to confirm if a patient is a candidate for the mild® Procedure, we asked James Lynch—an APP with the Pain Consultants of San Diego—to walk us through his tips and techniques for magnetic resonance imaging (MRI) review. In the following article, he shares pearls for becoming confident in imaging review and provides a series of videos so you can follow his step-by-step approach to determine if patients with lumbar spinal stenosis (LSS) should make the move to mild®.
As an APP in an Interventional Pain Medicine practice that offers the mild® Procedure, reviewing MRI images to determine the presence of hypertrophic ligamentum flavum (HLF) is a critical aspect of my role. Prior to joining this practice, I had very little experience reviewing MRI images. It was not part of the core curriculum while training to become an APP, and it was not an area that I felt very confident in. I’ve become more familiar and proficient with imaging review; however, I can say that it’s much more straightforward than it may initially seem. Through hands-on experience, by sharing clinical pearls among peers, and by watching step-by-step videos like those included in this article, I became competent, comfortable, and confident performing image reviews to identify mild® patient candidates—and I know other APPs can too.
Why Is Imaging Review Important?
We know that up to 85% of spinal canal narrowing is caused by thickened ligament. When we see patients with symptomatic LSS, if HLF is present, we will likely advance to mild® to provide patients long-term relief using a therapy that has a safety profile equivalent to an epidural steroid injection (ESI), but with lasting results. Being able to review a basic MRI empowers me to identify patients who may benefit from the mild® Procedure and confidently present my recommendations to them. This confidence helps build trust between me and my patients, and makes them feel more comfortable and assured prior to scheduling their mild® Procedure. Having more patients move to mild® means that I’m giving my patients a chance to achieve clinically meaningful, statistically significant improvements in mobility, Oswestry Disability Index (ODI), and pain reduction on the Numeric Pain Rating Scale (NPRS). It’s also incredibly rewarding to hear patients tell me about what they’re able to do now that they can walk further and do more activities than they could before.
MRI Imaging Review with mild® in Mind: A Step-by-Step Approach
Getting Started: Reviewing the MRI Report
Step 1: Linking the Sagittal and Axial Views
Step 2: Identifying Anatomical Landmarks
Step 3: Measuring the Ligamentum Flavum
LSS is highly recognizable by the signs and symptoms patients commonly exhibit, including pain, numbness, or heaviness when standing or walking, and finding relief by sitting, bending forward, or sleeping curled in the fetal position. When we see these signs in our patients, we’ll order an MRI to confirm the diagnosis and determine whether the patient is a good candidate for the mild® Procedure.
When we request an MRI, we’ll get a report and the imaging back for that patient. During my review of the report, I look line-by-line, specifically confirming whether the report notes central canal stenosis. It is also helpful to make note of other contributors to central canal stenosis (such as enlarged facets, disc bulge, etc.) in order to properly prepare a patient for potential follow-up expectations.

Tip: As you gain comfort with image review, practice reviewing the MRI first and report second to confirm their diagnoses.
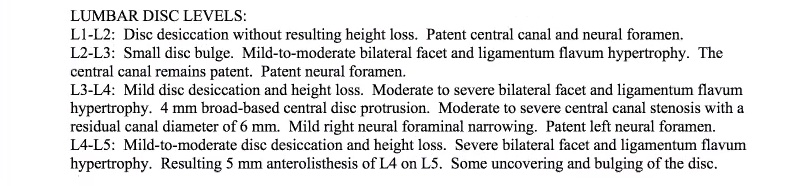
In the example shown here, I would note the following:
- At L2 or L3, the patient has mild-to-moderate bilateral facet and ligamentum hypertrophy; however, the central canal remains patent and the patient does not have central canal stenosis at this level.
- At L3-L4, the patient has moderate to severe central canal stenosis with a residual canal diameter of 6 mm.

Reminder: You can also request that the radiology report include a measurement of the HLF, which can make it easier to review.
Because I have confirmed the presence of central canal stenosis in the report, I’ll then review the imaging to determine whether the patient is a candidate for the mild® Procedure. You can also take the reverse approach and review the imaging first, and then use the radiology report as a confirmation of your own findings.
A note on software: While the specific software demonstrated in this blog is Ambra Health, much of the imaging software used today is similar in function and review procedures. Whether you’re using Ambra Health, Sharp, or another software option, the tips and tricks demonstrated in this blog should be consistent, regardless of the software you’re using.
In pulling up the images, I typically begin setting up the images to facilitate a clear and efficient review process. Begin by adjusting the layout of the software to show 2 images at the same time.
On the left-hand side, we will show the sagittal view, or vertical cross-section of the patient. On the right-hand side, the axial view, or horizontal cross-section of the patient, will be displayed.
Press the “Link” command in the system software to correlate the images together and select the STIR images (T2 weighted images).

Tip: The reason I use the T2 image is because the cerebral spinal fluid actually brightens up, making it a lot easier to assess the spinal canal.
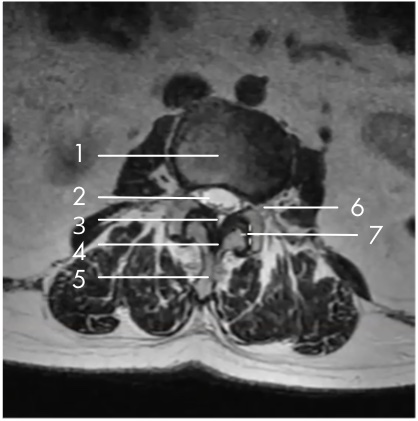
- Vertebral Body
- Central Canal
- Epidural Fat
- Ligamentum Flavum
- Spinous Process
- Exiting Nerve Root Space Under Pedicle Facet Joint
- Facet
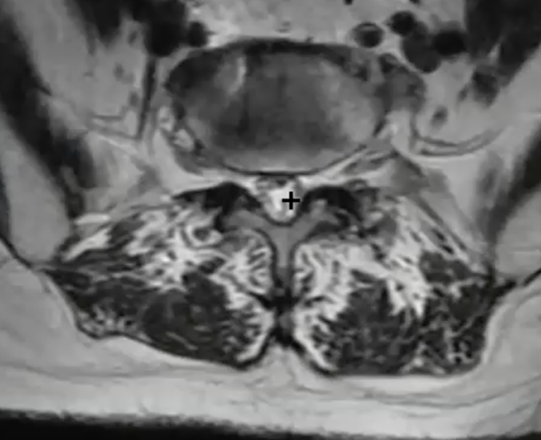
My specific area of interest in evaluating the mild® patient candidate is the small black area, which is the ligamentum flavum, highlighted in the image here.
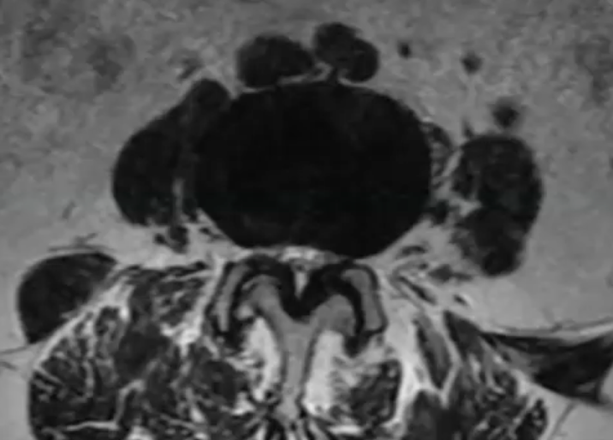
In the small white area, we can see the central canal where the nerves are housed. In this image, we can see that the canal is very small, with very little white showing. This is consistent with central canal stenosis, and in this case, we can see clearly that the hypertrophic ligamentum flavum is compressing the nerves.
By moving our image up to L2-L3, we can see an excellent comparison of the healthy central canal. The large white area shows that at this level, the thin black ligament is not compressing the nerves.
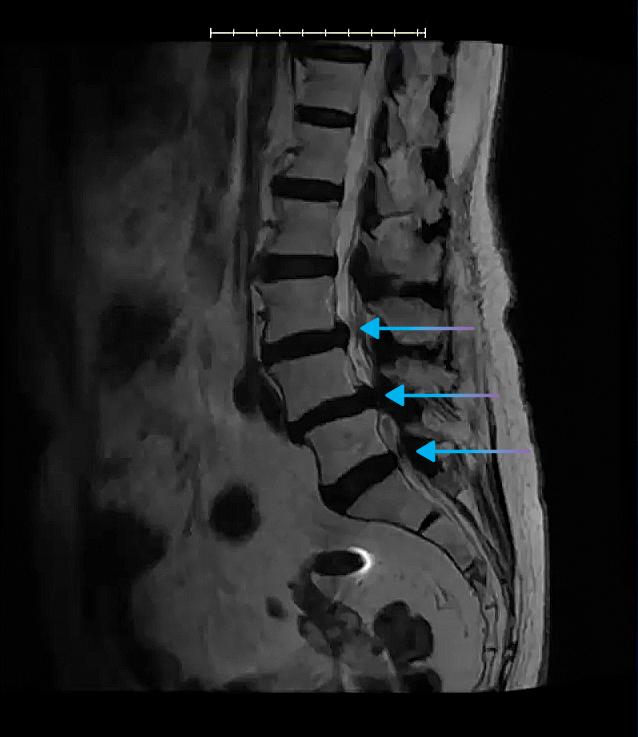
In the sagittal view, you’ll be able to see clearly where the spinal canal narrows, and this is helpful in identifying all levels where the central canal is stenosed.
We can also see here that the patient has a disc bulge, indicative of multi-factorial central canal stenosis.
It’s important to remember that comorbidities are common among LSS patients—in fact, a Level-1 clinical study of mild® patients demonstrated that just 5% of patients presented with central canal stenosis only. The presence of comorbidities, such as foraminal narrowing, lateral recess narrowing, or facet hypertrophy DO NOT RULE OUT patients as mild® Procedure candidates. Indeed, the same clinical study found that the majority of patients with comorbidities achieved an ODI improvement of ≥10 points at 2-year follow-up.
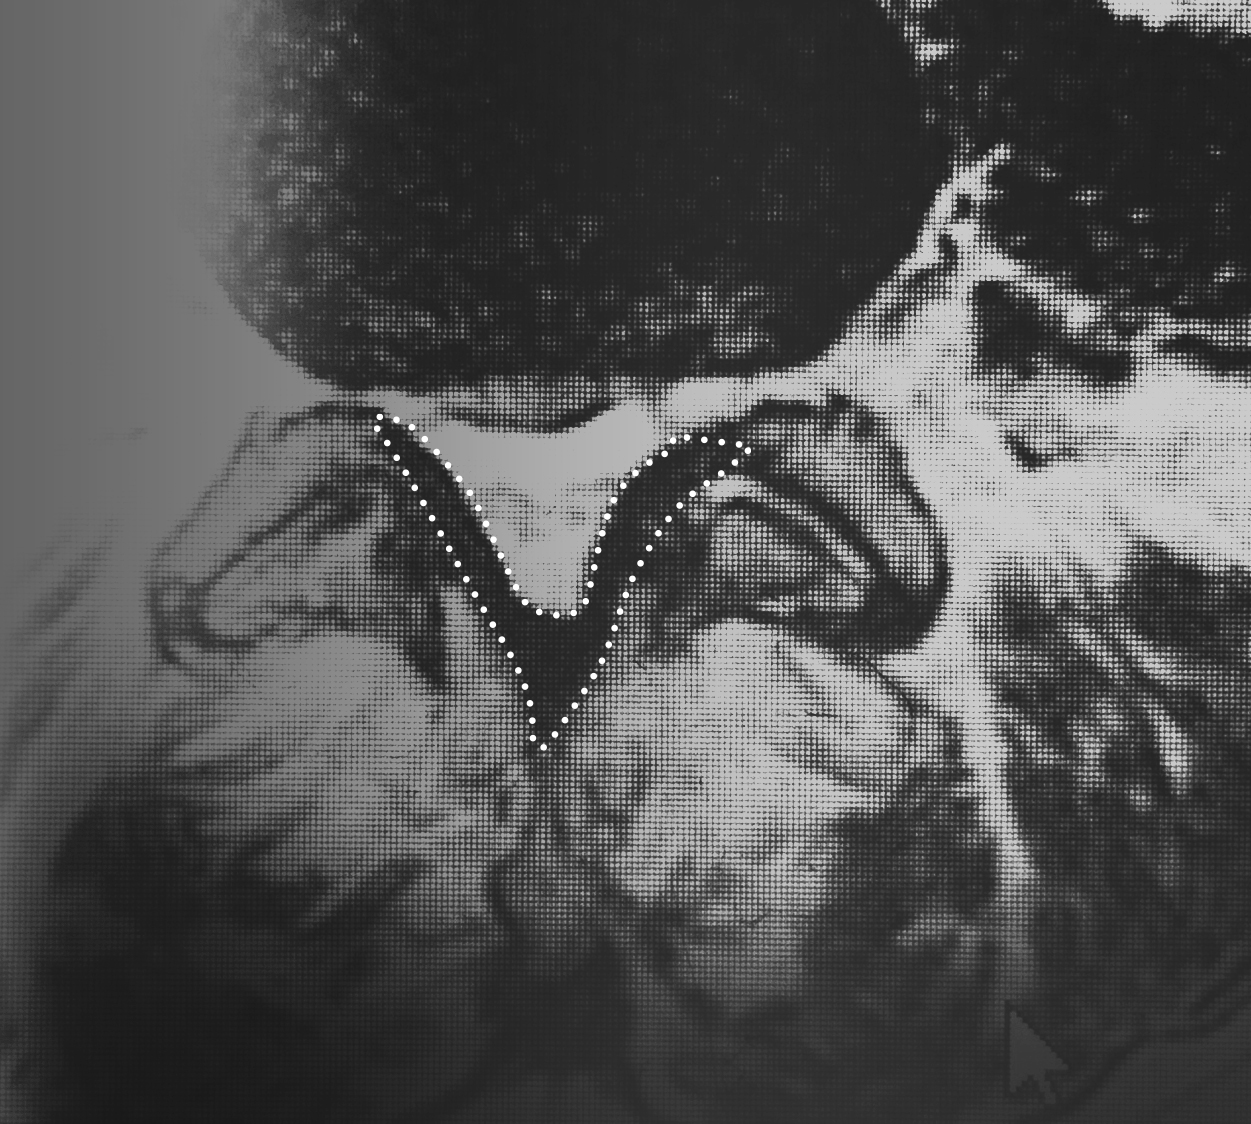
Using the length tool in the software, I can draw a line across the ligament (the dark area indicated in the image below) to obtain the ligament measurement.
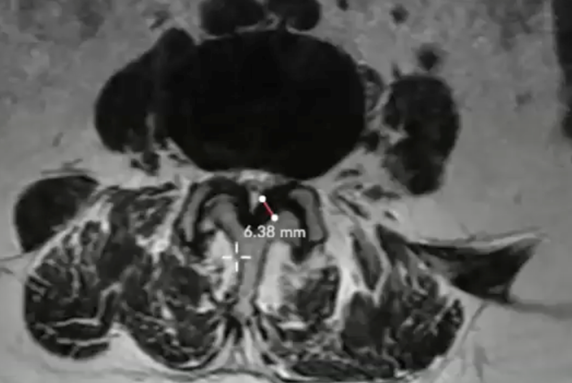
Here, the measurement clearly shows an HLF of 6.38 mm. I will then repeat this measurement process at each of the levels that are affected by central stenosis (per the report, and as seen in the sagittal view).

Tip: As a reminder, any patients with HLF ≥2.5 mm may be considered a candidate for the mild® Procedure.
My Pearls for Easier Imaging Review
Once you become familiar with imaging review, you’ll develop your own tips and tricks that make the process easier and more efficient for you. Here are a few things that I suggest that can help when you’re just getting started:
- Request an HLF measurement in the report. If I see a patient that is suffering from “Shopping Cart Syndrome” and exhibiting symptoms consistent with lumbar stenosis with neurogenic claudication, I’ll put the primary diagnosis code as “lumbar stenosis with neurogenic claudication” on the MRI request. I’ll also add a note to the order for the radiologist to measure the ligamentum flavum at the levels that are being affected and are stenotic. This can also be programmed into your EMR system as an automated note for every lumbar MRI request.
- Scroll to find the best view. When the MRI is capturing images, it’s going to be at different depths, and may vary depending on the position of the patient. After I select the level of interest, I’ll typically scroll through several images (using the up and down arrow keys on my keyboard) to make sure I have the clearest view of the ligament and central canal.
- Find your level by starting at the sacrum. It’s possible to determine which level you’re looking at by counting from the sacrum. I also keep in mind that L5-S1 is where the spine really starts to have curvature.
- Focus on restoring functionality. If HLF is present in the MRI, we can feel confident about a decision to move to mild®, to provide LSS patients long-term relief using a therapy that has a safety profile equivalent to an ESI, but with lasting results. It’s common that you’ll see comorbidities that will need to be addressed eventually, but we’ll often begin with the mild® Procedure to restore functionality and help patients get back on their feet.
An Ideal mild® Procedure Candidate
In this video, you can see an end-to-end example of the imaging review for an ideal mild® case. In under 5 minutes, you can see how I:
- Review the report: Start going line-by-line. At L4-L5, the patient appears to have bulking of the ligamentum flavum, resulting in narrowing of the central canal with no other noted comorbidities.
- Link sagittal and axial images: After selecting a 2-image layout, select the T2 images, where cerebral spinal fluid brightens up, making it easier to identify the spinal canal.
- Evaluate the level of central canal stenosis: Even though the radiologist has provided a report, I like to review the nuances of the images, knowing that I’m looking specifically to determine whether the patient is a good candidate for mild®.
- Measure the ligamentum flavum: With my length tool, I can measure the ligament to make sure the HLF is ≥2.5 mm. In this case, an HLF of 4.18 mm confirms the patient is a candidate for mild®.
What if MRI isn’t an Option?
When a patient can’t have an MRI, we will instead send them in for a computed tomography (CT), ideally with a myelogram. A myelogram will highlight these relevant anatomical structures, so you can see the ligament and determine the patient’s candidacy. Even if a myelogram is not an option, be sure to indicate a primary diagnosis for lumbar stenosis when you order the CT, and the radiologist will then assess that patient for lumbar stenosis and HLF.
Using Imaging to Support Patient Education
When patients are in the office, I’ll often bring my laptop into the exam room and show them their imaging on screen. Being able to see their own anatomy, and specifically the hypertrophic ligament pressing on the nerves, is incredibly helpful to demonstrate this root cause of their LSS.
Then, I can also use the imaging to clearly point out how mild® addresses a major root cause of LSS by removing excess ligament tissue and leaving no implants behind. I’ll also show them where the nerves are being compressed and educate them about how mild® restores space in the spinal canal, which reduces the compression of the nerves. Most patients understand how the mild® Procedure works much more easily when they can see the images themselves, and it also helps them realize how the mild® Procedure can provide long-term relief and restore mobility.
Embracing Imaging Review: Don’t Be Intimidated—Practice Makes Perfect!
When I first started with imaging review, I was much less comfortable and confident than I am today. Knowing that our practice is committed to helping more patients move to mild®, I recognized that becoming comfortable with imaging review was a critical aspect of my role. Even though MRI review was not something included in my initial APP education, I realized that becoming proficient gave me an opportunity to bring additional value to our patients and practice.
The best way I found to get comfortable with imaging review was to dive in and review previous cases so I could become familiar with the anatomy and structures. Beyond hands-on experience, there are resources that offer additional support, including:
- Online video resources: There are many videos available online that walk you through MRI reviews and will help you become more familiar with some of the structures.
- Clinicians in your practice: Work with other physicians and APPs in your practice to hone your skills. I’d often review an MRI, and then share my findings with the physician I work with to confirm that they were seeing the same diagnosis that I saw.
- Webinars: View webinars geared towards APP education, especially in imaging, such as The APP Imaging Workshop—A Collaborative Approach to mild® Patient Selection here.
- Your Vertos representative: Our Vertos representative has been a great resource for our practice and is especially supportive when it comes to imaging. Connect with your representative to schedule a lunch-and-learn or meeting to review images together and access the latest educational materials.
With additional practice and experience, you’ll quickly become much more comfortable with imaging review. You’ll also notice how many of your patients with LSS have HLF and are candidates for the mild® Procedure. By putting more patients on the path to lasting relief with mild®, you’ll get to see first-hand how regaining mobility can be a life-changing improvement for the patients in your care.